|
Note: If using Outlook click the above bar where it says “Click to download photos”
 In This Issue: We are very pleased to present Ontario artist Jan Scales, the creator of the bevy of geese pictured above. Jan is new to the world of gourds  Many of you have attended drumming circles and the merits of drumming are well-known. We have received many letters regarding drum-making. There is something very satisfying about banging on a drum that you have made with your own hands. This has prompted us to write a tutorial on "How To Make A Gourd Drum." The simple design is a Djembe style drum and it is easy to transport, use and has an excellent tone.  Happy Valentine's Day! Here is the link to the tutorial on how to make this romantic lamp designed by Lois Dean. (Click on Issue 12.) http://www.northerndipper.com/news_archives.php Northern Dipper is shaping up to have a busy year. Eleven show dates so far, new products continuously being considered, workshops at the farm and Internet orders keep Carolyn and Linda busy.
The mail bag is always a highlight in their day so keep sending in your letters, comments and photographs...they are always well received!
Jan Scales
Nature Influences Gourd Art 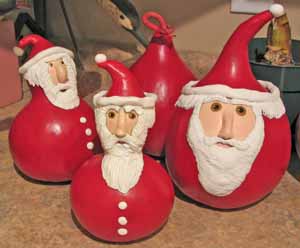 Jan is new to the world of gourds. It is a world that intriques her and presents opportunities for artistic growth and exploration. In Jan's own words here is the beginning of her journey.... "Having drawn and painted from the time I was a child, it is and was, my first hobby. I am, for the most part, self-taught although in later years courses at Georgian College improved my techniques and broadened my media experience."  "Always a nature lover, I enjoy camping and spending time outdoors (often with a friend or two, and my Australian Shepard Callie) observing, collecting, and of course, preserving the moments via photography." "Digital photography has made it a lot easier, and in some ways taken away the "challenge" part, but it is still enjoyable for me."
"During a trip down the Blueridge Parkway to Cherokee I stopped at many craft shops and discovered beautiful gourd art. I was enchanted by everything that I saw and I left the area wondering how I could obtain or grow some gourds for myself."  "I did not find anyone with gourds and the yearning smoldered, put on hold indefinitely, but rekindled everytime I drove the Blueridge. Then one day imagine my delight when a friend told me about Northern Dipper." "We signed up for a workshop and the rest is history! A few more workshops with Carolyn have introduced me to new products and given me a basis of rim working, paint techniques and a new interest in embossing, metallic leafing and Apoxie sculpting."  "Now in 2010 I will have some time off that is earmarked for gourding as well as enjoying some long overdue reading. I will continue exploring the wonderful world of gourds, perhaps developing a style of my own along the way."
We have no doubt that you will be developing your own unique style Jan! Thank you for sharing your art and your story with us. See you soon. Carolyn and Linda Tutorial: Making A Djembe Style
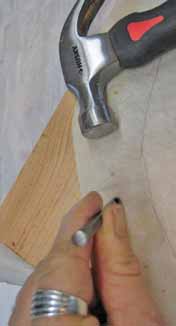
Gourd Drum by Carolyn Cooper  Step 1: Cutting and Sanding The gourd I am using is a large kettle approximately 14 inches in diameter. Clean the outside and get ready for cutting. The point where you cut the gourd for the skin placement is important. Do not cut in the middle of the gourd but closer to the bottom of the gourd. (The bottom is the wide end, the top is the narrow end.) Mark a line as precisely as you can and cut. A lazy susan and a stack of books can help in drawing out a good line. Cut the top end of the gourd as demonstrated in the photo above. Lay the bottom cut end of the gourd on a table and examine the edge to ensure that the gourd sits flat. The edge has to be smooth and even. A trick is to sprinkle some flour on the table - the flour will stick to the high spots and that is what you will be sanding. Tape or staple a couple of rows of sandpaper at a work station. Place the gourd on the sandpaper and move the gourd up and down and in a circular pattern on the sandpaper until the edge is sanded smooth and level to the table.
Finish cleaning the inside of the gourd and decorate the outside shell however you like. Step 2: Marking The Skin Place the gourd on the flattened goat skin that is 1 1/2" - 2" larger than the opening of the gourd. Using a pencil lightly mark the outline of the gourd. (The skin should have at least 1 1/2" - 2" of overlap from this line.) Next you are going to mark where the cord will be going through the skin to secure it to the drum. For this large 14" gourd I divided the skin into 16 sections. (Keep in mind that 16 sections has 32 holes.) For a smaller gourd I would split it into 8 sections.
To mark simply fold the skin length wise in half. Do not crease the skin all the way across. Apply pressure at the cut edge and mark with a pencil. Now fold width wise in half and mark the cut edge. Now you should have four quarter sections. Fold the quarter sections together and mark. Continue until you have 16 sections. Step 3: Punching The Holes and Prepping The Skin Half way between the edge of the skin and the outline of the gourd you will be punching in two holes on either sides of the marks. The holes should be approximately 1/2" apart. I have a scrap of pine that I hole punch on.
Once the holes are punched put the skin in a sink of warm water (not hot) until soft. I like to leave mine at least 2 hours. Meanwhile cover your ring by wrapping it with your choice of material. I use scraps of leather and attach them using white glue. Step 4: Dealing With The Cord
Put the ring on the gourd and measure the distance between the ring and the bottom (skin) end of the gourd. The distance between my ring and the gourd edge was 9". Using the following equation figure out how much cord you will need. Here is what I will need for my drum... 9" x 32 (holes) = 288 divided by 12 = 24 feet of cord. I am using parachute cord as it is strong, attractive and easy to handle. The cut ends will fray so I melt them using a lighter. Once the cord starts melting blow out the flame and quickly cool down by using a wet piece of paper towel. Pull the end into a point. Be careful - that melted cord can really burn your fingers! Step 5: Attaching The Skin Place the skin under the gourd on a clean surface. Alien the gourd and use 6 pushpins to temporarily hold the skin in place. Slide the gourd and skin to the edge of the table. Find the middle of the cord and start placing it over the ring and through one set of holes in the skin; back over the ring in the same direction as the first. Do it in one direction until the cord runs out. Continue on in the other direction using the other half of the cord. Do not pull too tightly as this will be done at the end of the next step. Step 6: Stringing More Cord Cut another piece of cord 2 1/2 times around the drum head. Start in the middle of the cord and loop at the main cord junction. Go through each loop top to bottom with one end of the cord and then bottom to top with the other end of the cord. Tighten both ways and tie off. Go back to the main cord and tighten the cord working around the gourd both ways. You will find that this will take several times before it is totally tight. Take care not to rip the hide. 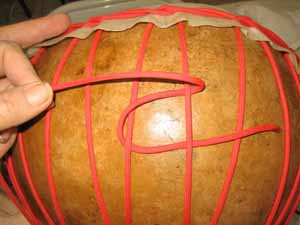 The Tuning Cord Step 7: The Tuning Cord Cut your final piece of cord the length to go around the head. This is your tuning cord. Anchor to the main cord, over far cord, and back under it, over near cord then under it. Pull tight and the cords will flip. Continue all the way around, tie off, add a few feathers and beads to decorate. Proper drying time is essential! Do not be tempted to play it - not even one beat - until it is dry!!! For information on drum-making supplies and dried speciality drum gourds click here: http://www.northerndipper.com/embellishments.php Reader's Corner
Hello everyone,
The HOGS (Happy Ontario Gourders) met at Northern Dipper for a fun-filled workshop a couple of weeks ago. At each meeting someone teaches a new technique or project and amid the laughter, the getting caught up and many cups of tea, beautiful things happen. In this photo Debby Russell is teaching us how to create stunning Inuit figures. This workshop was originally taught by Elizabeth Gorden at the 2009 CGS Gourd Festival.  Here are our finished projects.  Thanks Deb, we all had a great time! Carolyn and Linda Greetings Northern Dipper, Here is a picture of some Santas that I did at Christmas. They are a good way to use up pieces out of the scrap box. Enjoy... Annemarie  Hi Annemarie, We love these Santas! They are charming and you are right...they are a good project to use gourd tops. Thanks for sending them in. Carolyn  This is Carolyn's daughter Jennifer who travelled from Nova Scotia to attend the Ottawa Christmas show. Here she is making a dream-catcher ornament. That gourd bug, particularily among families, is contagious!
 This is Jason, Carolyn's son. His help was invaluable especially during show time. Jason doesn't mind washing gourds but cleaning the insides is not a favorite task. We all hear you Jason...one or two isn't bad but when you are cleaning a couple of hundred!!!
 NEXT ISSUE: We are so excited about next month's artist that we can hardly contain ourselves! Joan Blackwell's work is colourful and some of her pieces have an Aboriginal flavour. In addition to creating beautiful artwork Joan is a born storyteller...entertaining and informative! March is the month when many of us start thinking about what we are going to be planting next summer. We will have an article on things to consider when growing gourds such as space, sun requirements, etc. This article may influence the types of gourds you plant and how you plant them.
Please stop by and say hello if you can attend the Stratford Garden Show and Canada Blooms. Both are excellent shows, a must if you are a gardener. They are also great place to escape the tail end of winter and experience a little taste of spring!
Carolyn Cooper and Linda Bond
|
|